Sunday, June 28, 2009

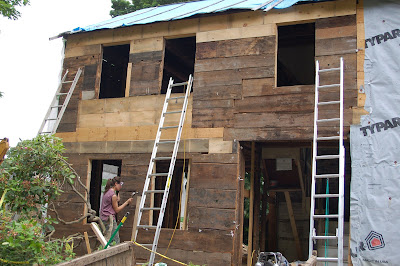
Today was a slow day because of the rain and because I was lacking some key materials to go any further. I was able to get the shingles to the top of the window but was not able to go over the top and continue up because I don't have the proper window flashing to cap the window with.
We'll also have to get some ladder jacks so that we can work up higher. Working from a ladder is okay but it will be much quicker if we can get two set up and a board running between them. We're crossing our fingers for some good weather this week so that we can make some real progress! We'll keep you posted!

Saturday, June 27, 2009

What started as a very frustrating day, running all over New Hampshire looking for stainless steel staples for my siding gun, ended fairly well with a good amount of siding accomplished. It literally took me three trips to Home Depot to remember everything I needed. Ug.
We have decided on a 5.5 inch exposure. This is fairly standard on Nantucket and on the Cape. Apparently on the North Shore people choose up to a 7 inch exposure. We like the look of the smaller reveal, but it obviously requires more shingles. The truth of the matter is that the exposure ranges from 5 to 6 inches so that the shingles will line up with the top and bottom of the window..a little cheating was called for. Most people won't notice unless told. Next time you are looking at a shingled house, take a close look and you'll see that not all exposures are the same.

Anyway, there you have it -- my Saturday from 9am to 7pm.


Friday, June 26, 2009

So most of today was spent running around picking things up...another rough cut pine board for sheathing on the back, white cedar shingles for the side of the house, ice and water guard for the windows, caulk and caulking guns etc...the one thing that I couldn't find today is stainless steel siding staples...does anyone know where I can get these?! We don't want to use galvanized staples because the will cause staining on the shingles...but Lowes, Home Depot and Moynahan lumber don't carry stainless...alas. Anyway -- you can see in these first two photos that we were able to get more of the clapboards on the house today. Slow progress but good progress.
Rocky and Mark framed the two windows on the right side of the house and installed them. They also attached two corner boards, and the water table (see bottom photo). They did this so that I could start doing the shingle siding while Leigh is away visiting our nephew and family in Lancaster PA...if I could only find those damn stainless staples...

Hopefully Riley and I will be able to make some progress tomorrow...


Thursday, June 25, 2009

Today Rocky and Mark got two windows in and put up the corner boards. They also outlined the front entry so that we could start siding. We didn't have much daylight to work with but we got four clapboards on...tomorrow we should make a bunch of progress...


Wall cave in...

So, we had a little cave in. Gary, the building inspector suggested that we pour footings for the old foundation wall. Ok -- so in order to do this, we dug down about 10 inches beneath the rock foundation and then three inches under it. The intention was to then pour cement and create a footing to re-enforce the wall. Sounds like a good idea. We'll on the wall that you see below, we had already removed a few LARGE rocks to add space for a bulkhead. The result was that the wall caved in. No one was injured and it wasn't as much of a disaster as you would think.
We ended up pouring some of the footings as you can see in the photo below. Once the rocks are removed we'll have to add a new foundation wall. Good news is that the house is still standing!


Sunday, June 21, 2009

June 20 - 11 hours of work

We started this morning out by going to Esty's Lumber Yard in Groveland to pick up some rough cut 1"x12" pine boards to replace some of the sheathing that was pieced together on the front left of the house. Over the last few weeks, Rocky has been trying to use as much of the old sheathing as possible to patch the house back together. While he did a good job with the material that he had, you can see in the photo above that it really was a patchwork. Since sheathing is an important element in the structural integrity of the house, we decided that longer runs of 1x12 would help support the house better. In the above photo, I am pulling off the 1790 sheathing.

On new houses it is typical to use plywood or OSB to sheath the house. However, according to the preservation covenant we are required to use 1" rough cut pine to sheath the house. While there seems to be some room for interpretation in the covenant, we felt like adding the OSB on top of the old sheathing might be taking a bit too much liberty with the intention of the preservation document.
Here you can see the new sheathing boards. There is one that goes all the way to the roof and then the other three are beneath the upstairs windows. To make these fit together nicely, we cut them on a 45 degree angle - they fit nicely while still allowing the house to breath. Leigh is taking out any old nails or pounding them in so that they don't rip the Easy Guard house wrap.


Next we wrapped the front of the house in Easy Guard House wrap. This is like Tyvek - it allows the moisture to get out of the house but keeps it from getting in.


Here's the house all wrapped and ready for insulation. Because there are so many gaps in the sheathing, we decided to apply a layer of 1/2" Styrofoam insulation on the exterior of the house.
We will also use spray in insulation to fill the gaps from the inside, trying to make the house as energy efficient as possible.

In this photo you can see the results of 11 hours of work!


Wed June 17 - It doesn't look any different, but...

...we did work today! Leigh here - I guess I could say this was the first official day of my summer job. Mark the Mystery Man finally made an appearance to help resolve some small but important issues. There aren't any photos because the changes are not really noticeable, but here is what we did:
Snapped a level line on the first floor to see if the window openings were lined up properly. Aside from having to cut down some sheathing a little bit, they were dead level. Good news! We measured up to check the window sills on the 2nd floor and they turned out to be level as well.
One end of a piece of new beam over the center window on the 2nd floor was not lined up properly so there was no room for sheathing over it, so we first separated it from everything it was nailed into it and then pounded it into place.
The framing (new and old) on the second floor (left side as you are looking at the front of the house) was loose, so we added some supports below it to nail it into.
While we were working on this, Mark nailed a 2x4 vertically to the outside wall and noticed that it was a little bowed out, right at the 1st floor ceiling/2nd floor floor. So we attached some straps to the wall and to a beam inside the house, then used a rachet to tighten them and pull the wall in. Then we nailed it into the supports.
We were also waiting for Gary, the building inspector, to come by and look at the hole for the new foundation. He came by around 4, said it looked fine, and gave us several other suggestions including pouring a footing all the way around the old foundation, renailing all of the old sheathing, and covering all the sheathing with OSB (like plywood but stronger) for extra structure and support.
Did we take Gary's advice?? Find out next time!

Sunday, June 14, 2009

So, progress continues to be slow but there are definite steps forward that have been made in the last couple of weeks. In this photo you can see Leigh standing in the basement of the old part of the house. Just to the right of Leigh is where the bulkhead will be and to the left you can see the new wall and supports that are holding up the house. What's missing you might wonder? We'll the old foundation is missing...
In order to dig the basement in the new part of the house deeper, it was important to remove the old side and back foundation walls which were field stone -- really really large field stone. So over the last couple weeks Mark and Rocky have been supporting the house so that when the old foundation was removed, it wouldn't collapse. To that end, the middle of the wall was removed and a cement footing was poured (see middle of this photo). On top of the cement footing they built a wall of pressure treated lumber that is now supporting the middle of the house.

Part two was then removing more of the foundation wall and inserting the post to the right of this photo. It is on top of a cement footing as well. We weren't there when this was happening but we think that they used the excavator was used to prop up the house while the post was being put in place,

At this point, we believe that we may be ready to start putting the forms in for the foundation but we're note sure...there's still plenty of work to be done in the old part of the house, including windows, roof, rebuild of chimney.

Think we'll be in by end of July?